Aims of the lesson
- Know the importance of a site map – Create a simple site map
- Create a simple text based navigation bar
- Style the navigation buttons using CSS
- Add hyperlinks to the navigation bar
- Time permitting – Create a new html page save as ‘gallery.html’
- Preview in Safari
Create links and see how to style text
The website we updated today was the website that we had created in lesson 4 (recap)
We started by typing in the navigation bar, page titles that we were going to create in future lessons. Making sure you return after typing each title:
‘Home
Gallery
Contact Us
About Us’
This then creates new paragraph tags
After typing in the titles we then clicked on bullet point list in the page properties panel displayed at the bottom of the window with all the titles highlighted
We then changed the coding adding two new tags <ul> Unordered list <li> list item
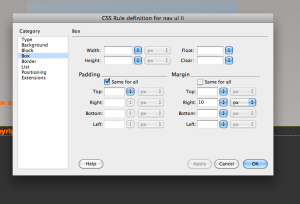
We then wrote a new CSS rule allowing the words to sit next to each other, when creating this new CSS rule we selected ‘compound’ as the contextual selector type. We choose this as this rule allows you to have your selections exactly how you want them.
So then our CSS Rule then appeared as ‘body nav ul li’ which meant that we had a list item in an unordered list in the navigation tag in the body tag (which is the whole website part) we already know that this would be in the body tag, so we then selected in the drop box of this rule changing it to ‘less specific’ which meant it then only displayed ‘nav ul li’ so this was now the same as before but only showed a list item in a unordered list in the navigation tag style. Once you have selected this correctly we then clicked ‘ok’ to this window.
This then brings up all the options in CSS in which you can change the appearance of your website. At first we started with the ‘List’ section and changed the ‘list style type’ to none.
We then moved down to the ‘Block’ where we chose the display as ‘inline’
After this we lastly changed the margins to 10px so that there was a larger gap inbetween each title on our website. We did this in the ‘Box’ selection.
Creating a Hyperlink
Once, we had created the new CSS rule and adapted it to how we wanted we then created each word into a hyperlink which would then direct you to other a page.
We did this by highlighting the first title named ‘Home’ and then typing in the link section which is displayed in the page properties panel at the bottom of the window. In this link I typed in ‘index.html’ which is the name of our website page that we have created over the last few lessons which is our home page, so we were just redirecting the home button to the main page again. Once we had made this hyperlink the word ‘Home’ then changed dark blue and underlined which meant it had successfully turned into a hyperlink. Also another tag then appeared in our html panel which was <a> <a/> the tag for a hyperlink.
We then created hyperlinks for the rest of the three titles ‘Gallery, Contact Us and About Us’ by doing the exact same thing as we did to create the home page hyperlink.
But the only difference was that we hadn’t actually created the pages for these titles so we typed into the link section ‘#’ which still created a hyperlink for each title but this was for a pretend page which is called a ‘Sudo link’.
Keyboard short cut for a hash alt & 3 – #
We then clicked ‘Link View’ at the top of the dreamweaver window which allowed me to show my website in a internet browser form which then I could click on my titles that had been hyperlinked.


